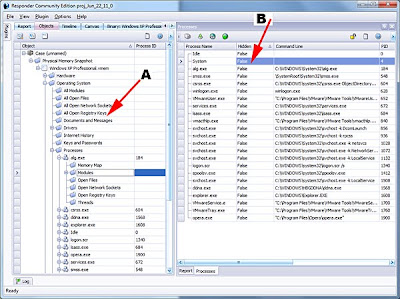
First, you should become familiar with the object tree. The object tree (shown in the graphic below, point A) illustrates how the data is organized within Responder after a physical memory snapshot has been reconstructed. You can query any of this data directly using the Responder API’s. For example, you could query low-level details about running processes (point B).

For this example, we are going to query the open network sockets. These are reconstructed from internal undocumented structures within the kernel (the same ones used by tcpip.sys and afd.sys). Even if a rootkit is hooking netstat, the data would still be revealed in Responder. In our example, we have some outbound connections to China. Using our plug-in, we are going to read the connection data and plot the location of the registering entity using Google Maps.

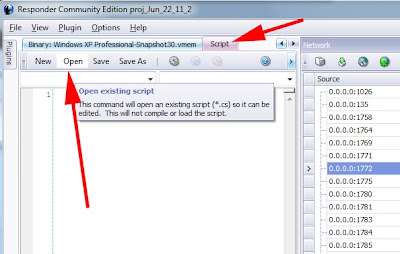
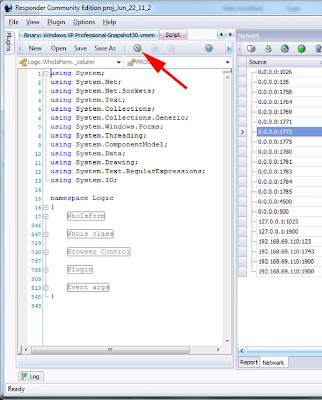
To load the script, first go to the script TAB and select OPEN. Once open, the script will be visible in a code-editing window. Press the PLAY button to load the script.

As you can see, the script is written in C#. Almost all of the GUI components in Responder are written using C# and, for those who haven’t tried it, you will find it to be very similar to Java. The language is very easy to learn and use.
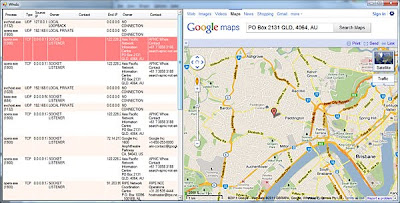
After we load the plugin, the list of network connections are obtained along with registration data. The address of the registration is then plotted on Google Maps.

When a plugin is loaded, the OnLoad function will be called with a list of all open “Documents”. In Responder, a “Document” is a container for data. The architecture requires that the user-interface be decoupled from the data. For those of you with programming experience, you may recognize the “Document/View” pattern here. At any rate, the list of open documents is passed into the OnLoad function and we need to locate the “NetworkBrowserDocument”. The network browser document has the list of all open sockets.
public bool OnLoad(ArrayList OpenDocuments)
        {
            try
            {
// get the frame document, this allows us to add menu items and menu bars
                _frame = FindMainWindow(OpenDocuments);

// see the Launch() subroutine to learn how to launch your own popup window
                Launch();

// init the whois class for later use
                _whois.ResponderForm = (Form)_frame.MainWindowInstance;
                _whois.Inspector = FindInspector(OpenDocuments);
// the network browser document gives access to open sockets
                _whois.Net = FindNetworkBrowserDocument(OpenDocuments);
For those who want to explore other documents, there are several example plugins that ship with Responder. For example, "StringsBrowserDocument" is responsible for showing lists of strings associated with a livebin. "SymbolsBrowserDocument" is responsible for symbols when a livebin has been disassembled (Responder PRO only). The "DriversBrowserDocument" has the list of detected device drivers.
In this plugin example, we have a helper function defined to locate the network browser document. Notice we use GetType() to locate the actual type of each document in the list. As stated, there are many different document types in Responder, usually one type for every visible window or panel in the application.
Logic.NetworkBrowserDocument FindNetworkBrowserDocument(ArrayList documents)
        {
// note the use of IDocument interface class here,
// use GetType() to compare instanced type against Logic.XXXX where
// XXXX is the document type you are after. Use reflection to see the
// whole list...
            foreach (IDocument doc in documents)
                if (doc.GetType() == typeof(Logic.NetworkBrowserDocument))
                    return (Logic.NetworkBrowserDocument)doc;

            return null;
        }
After finding the network document we can use it to query the list of sockets. Documents will have custom methods and utility functions for dealing with specific data (these are all different depending on document type). You can also access the raw data directly, usually in the form of name/value pairs (my preferred way to do it). This is shown below. Each attribute has a specific name and type as shown.
ArrayList socks = _net.Sockets();

// all objects are referenced by GUID
foreach (Guid socketEntryID in socks)
{
  // src and dest ip are stored as string
  string source = _net.ObjectName(socketEntryID, "sSource") as string;
  string target = _net.ObjectName(socketEntryID, "sDestination") as string;

  // remember that 'i' is UNSIGNED
  UInt32 sourcePort = (UInt32)_net.ObjectName(socketEntryID, "iSourcePort");
  UInt32 targetPort = (UInt32)_net.ObjectName(socketEntryID, "iDestinationPort");

  // the src and dest DNS names, obviously string as well
  string sourcename = _net.ObjectName(socketEntryID, "sSourceName") as string;
  string destname = _net.ObjectName(socketEntryID, "sDestinationName") as string;

  // a bool stores whether the session is TCP or UDP
  bool bTcp = (bool)_net.ObjectName(socketEntryID, "bIsTCP");

  string sockType = ((bool)(_net.ObjectName(socketEntryID, "bIsTCP"))) ? "TCP" : "UDP";
The socket list is stored as a list of object ID’s. Responder uses a GUID to identify every object in the project database. Every object that is found in the physical memory snapshot is assigned a GUID and can subsequently be looked up. In this example, we have a list of objects which represent sockets. The object ID can then be used to query additional attributes. In this example we query “sSource” “sDestination” “iSourcePort” etc. This is the generic attribute naming system used by Responder. The prefix is a type. ‘s’ means string, ‘i’ means integer, 'b' means bool. There are hundreds of these named attributes across the application - something I hope HBGary writes an SDK document for soon.
After obtaining the source and destination IP’s, our example plugin has a Whois class that is used to lookup the name and address of the registrar. This data is then passed to a browser control along with the URL for Google Maps so the location will be mapped on the right.
This plugin could be extended in many ways. For example, a geoip database or service like ip2location could be used to locate the missile-coordinates for a specific IP address, as opposed to the registration data. The plugin could also be extended to extract IP addresses from artifacts in memory, as opposed to active connections in the socket list. For example, IP address fragments stored in tagged page pool memory.
The plugin is open source and can be downloaded from HBGary’s support site.
Cheers,
-Greg
Ps. Thanks to Dean, the HBGary engineer who wrote this plugin